
Quality products for Life.
QC-50S
RC Quadrocopter Drone with HD Camera
Instruction Manual
OMaginon Quadrocopter
QC-50S
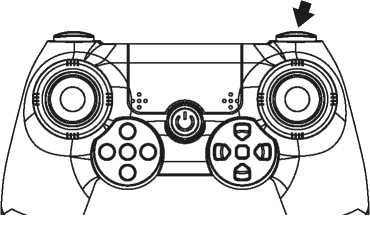
Remote control
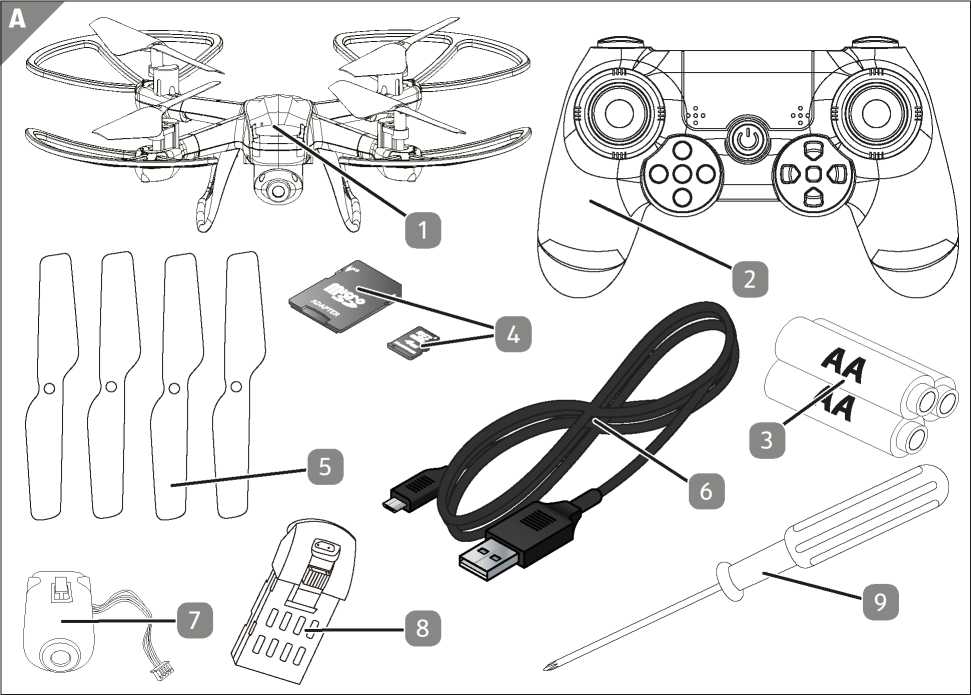
3x batteries type LR6 (AA) R Micro SD card with SD card
adapter
4x spare rotor blades

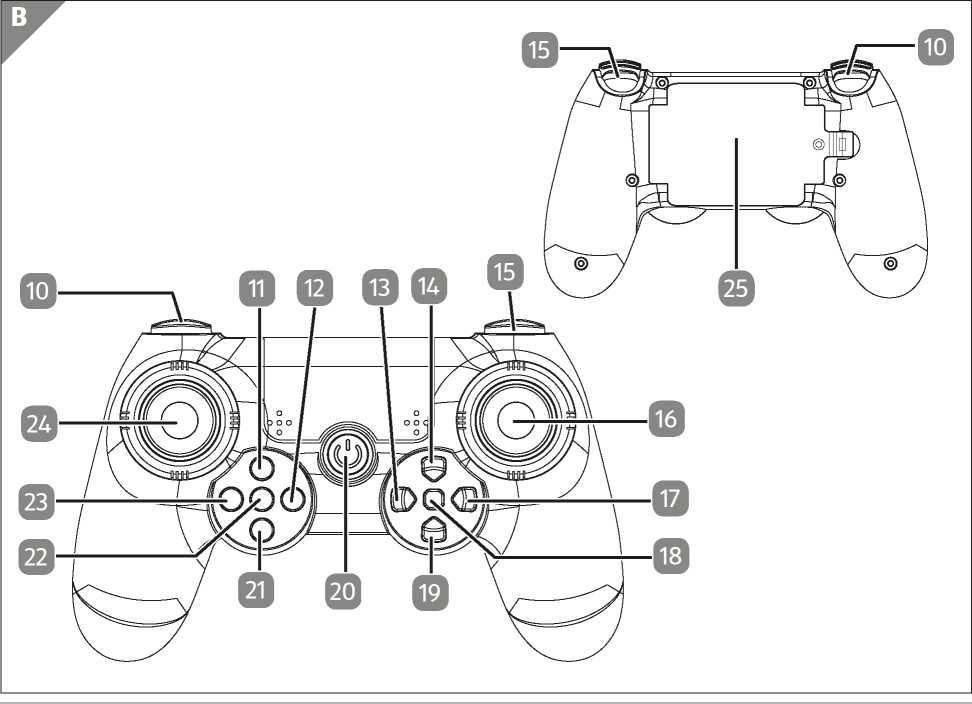
On/Off switch FB with power LED (blue)
Emergency stop
3 Fixing device1
/3 One key return
k24 Left control stick pitch/yaw
^ó) USB charging lead

Remote control battery compartment
^7| Camera with SD card slot
0Li-polymer battery with 600 mAh
Screwdriver
J0 Speed regulator
Start and Landing button
j2 Headless mode
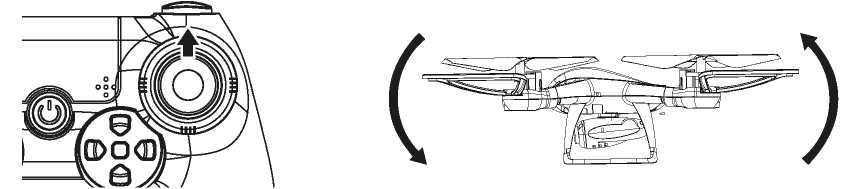
Roll trim (left)
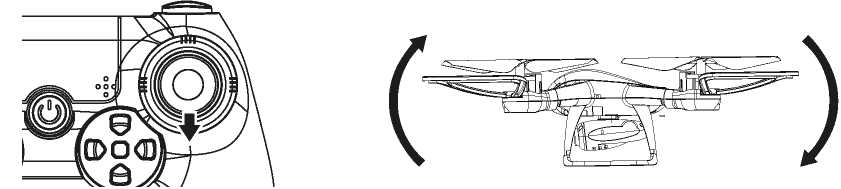
J4 Nick trim (front)
j5 Flip-Taste
JÓ Direction control stick
Roll trim (right)
j8 Video recording1
j9 Nick trim (back)
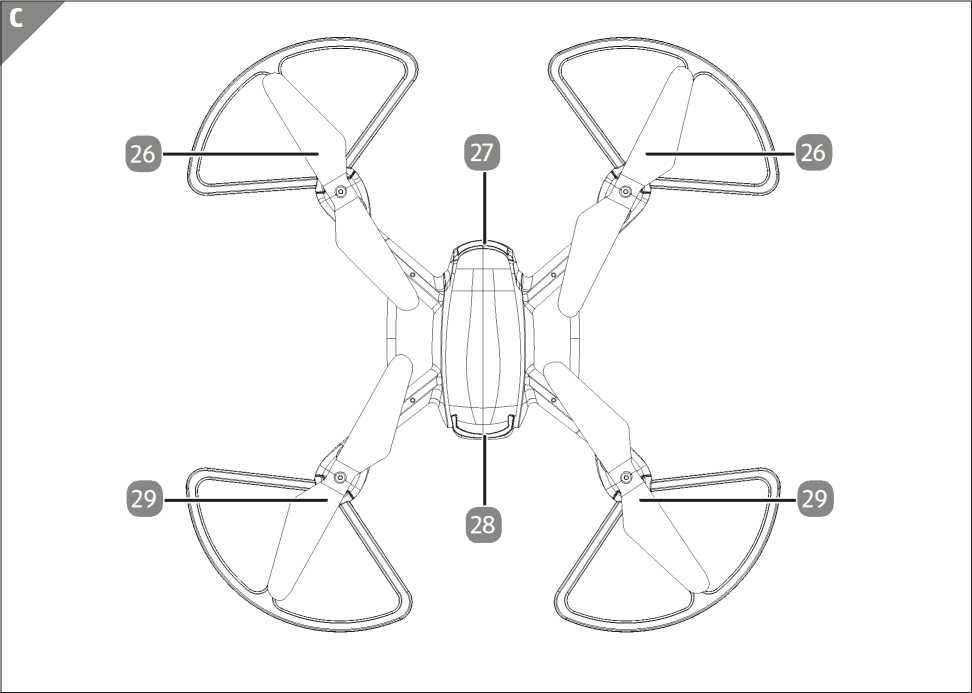
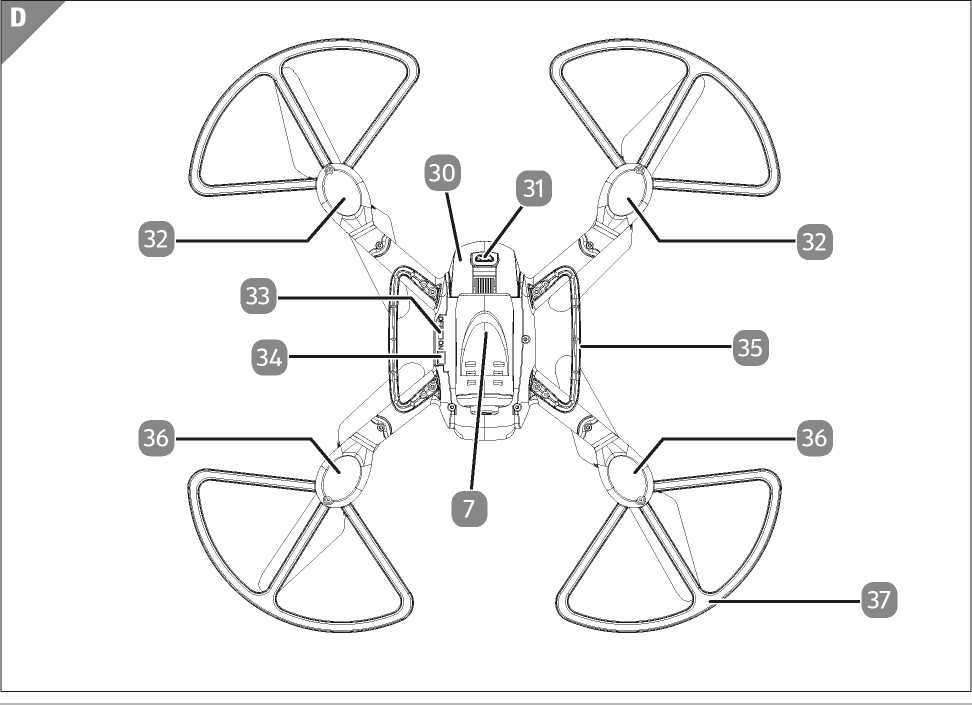
i26 Rear rotors
77) Rear LED light (red)


Front LED light (blue)
Front rotors
Battery
Micro USB port
Rear position LEDs (red)
On/Off switch Quadrokopter
Camera port
Landing gear
Front position LEDs (red)
Rotor shield
Delivery contents/device parts
Inserting the batteries in the remote control
Trimming of the flight attitude
Dear customer,
Congratulations on purchasing a high-quality MAGINON® product.
You have chosen a modern quadrocopter with excellent technical features and corresponding accessories that are incredibly easy to operate.
The quadrocopter come with a 3-year warranty. In case of a defect, you require the enclosed warranty card and proof of purchase. Keep these in a safe place together with the Instruction Manual.
Imprint
Issued by:
supra
Foto-Elektronik-Vertriebs-GmbH
Denisstr. 28A
67663 Kaiserslautern
Germany
Q This manual belongs to this quadrocopter. They
contain important information about the setup and
x use.
Read the Operating Instructions, especially the safety instructions, carefully before using the quadrocopter. Failure to follow these Operating Instructions may result in loss of data or damage to the quadrocopter.
These Operating Instructions are based on valid standards and regulations of the EU. Please also observe country-specific guidelines and laws abroad!
Keep Operating Instructions for further use. When passing on the quadrocopter to third parties, please make sure to include these Operating Instructions.
The following symbols and signal words are used in these Operating Instructions, on the device, or on the packaging.
This signal symbol/word indicates a high-risk hazard, which if not avoided, can cause death or serious injury.
This signal symbol/word indicates a medium-risk hazard, which if not avoided, can cause death or serious injury.
This signal symbol/word indicates a low-risk hazard, which if not avoided, can cause minor or medium levels of injury.
This signal word warns against potential material damage.

This symbol provides useful additional information about the assembly or operation.
Declaration of conformity (see chapter “Declaration Of Conformity”): Products marked with this symbol comply with all applicable Community regulations of the European Economic Area.
Products containing this symbol are operated with direct current.
This quadrocopter is designed exclusively as a quadrocopter. It is intended exclusively for private use and not for commercial use.
Only use quadrocopter as described in the Operating Instructions. Any other use is deemed to be incorrect and can cause material damage and loss of data.
The manufacturers or dealers do not accept any liability for damage resulting from improper or incorrect use.
Risk of eye injuries! Keep a safe distance of 1-2 meters to protect yourself or others from injury.
- To avoid accidents, never fly the quadrocopter near people, animals or other obstacles. Keep hands, hair and loose clothing away from the rotors. Do not reach into the rotors!
- Check that the quadrocopter is assembled as instructed. The installation must always be carried out under the supervision of an adult.
11
Faulty electrical installations or excessive mains voltage can cause electrocution.
- Do not operate the quadrocopter if it is visibly damaged or the USB charging cable is defective.
- For charging, connect the quadrocopter only to a near and easily accessible power source so that you can quickly disconnect it from the power supply in the event of a fault.
- If the USB charging cable of the quadrocopter is damaged, it must be replaced by the manufacturer or his service representative or a similarly qualified person.
- The quadrocopter must not be operated with an external timer or separate remote control system.
- Do not immerse the quadrocopter, remote control, USB charging cable in water or other liquids. Do not place objects filled with liquid, e.g. vases, on the quadrocopter or the remote control.
- The quadrocopter and the remote control should not be exposed to dripping or splashing water.
- Use an AC adapter (not supplied) only with the input voltage (5 V “) indicated on the type label. Doing so may result in fire or electric shock.
- The power supply unit cannot be used during thunderstorms. Doing so may result in electric shock.
A WARNING!
Hazard for children and persons with reduced physical, sensory or mental abilities (such as partially disabled, older persons with limited physical and mental abilities) or lack of experience and know-how (such as older children).
- These head sets may be used by children 8 years or older and persons with reduced physical, sensory or mental abilities or lack of experience or know-how provided they are supervised or have been instructed on how to safely use the quadrocopter and understand hazards resulting therefrom. Cleaning and user maintenance must not be carried out by children without supervision.
- This remote-controlled model is not a toy! Suitable for persons 14 years and older. Not suitable for children under 36 months.
- Ensure that children do not push objects into the quadrocopter.
- Do not allow children to insert objects into the quadrocopter.
- If you suspect that your child has swallowed a battery seek immediate medical attention.
A WARNING!
Asphyxiation hazard!
Contains small parts that can be swallowed. Keep away from small children.
13
If the battery is not replaced properly. Replace only by the same or an equivalent battery type.
- Remove old or empty batteries from the remote control. Replace all batteries in a set at the same time.
- Clean the battery contacts and the contacts in the remote control before inserting the batteries.
- When inserting the batteries, observe the correct polarity (+/-). Failure to observe the polarity may result in personal injury and/or property damage.
- Never touch leaking batteries without respective protection. If the battery acid comes into contact with the skin, wash the area with plenty of soap and water.
- Avoid battery acid coming into contact with eyes. If the battery acid comes into contact with eyes, rinse your eyes with plenty of water and contact a doctor immediately.
- Remove the batteries when not using the remote control for an extended period of time. This is to prevent damage due to rusted or corroded batteries.
- Never throw batteries into a fire, expose batteries to fire or other sources of heat.
- Always turn off the quadrocopter and the remote control if you do not use the quadrocopter, clean it or if a malfunction occurs. Remove the batteries and disconnect all connections.
- Never expose the battery of the quadrocopter to extremely low air pressure. An explosion may occur if flammable liquid or gas escapes.
- Under no circumstances should you disassemble, destroy, puncture or short-circuit the battery of the quadrocopter, there is danger of explosion!
- Disposal of batteries: Old or discharged batteries must be properly disposed of or recycled in accordance with all applicable laws. You can obtain detailed information from your local authority for waste.
- Follow the safety, consumption and disposal instructions provided by the battery manufacturer.
- Before disposal, batteries and the integrated battery must first be removed and disposed of separately from the housing.
Improper handling of the quadrocopter can damage to the quadrocopter.
- Pay attention to the environment in which you want to use the quadrocopter. Find a large, open and wide area without obstacles, pay particular attention to buildings, crowds, power lines and trees.
- Never use the quadrocopter near airports, railways or roads. Always keep sufficient distance from hazardous and specially protected areas.
- Do not operate your quadrocopter near radio stations, power lines, transformer boxes or the like! These devices can cause radio interference.
- Only use the quadrocopter outside in good weather. Do not operate the quadrocopter in rain, storm or thunderstorms.
15
- Find a flying area that meets the legal requirements and is free of obstacles such as trees, houses, etc.
- For safety reasons and in order to achieve satisfactory flight results, you must ensure a sufficiently large free space (approx. 6 x 5 x 2.5 m) for indoor use. The room must be free of obstacles (lamps, loose objects, etc.). In addition, there should be no airflow.
- Do not fly in an environment above +45 °C and below 10 °C.
- Do not expose the quadrocopter to direct sunlight, high humidity or dust.
- Do not drop or crash the quadrocopter from great heights. This can affect the flight characteristics and the lifespan of the quadrocopter.
- Be aware that some parts on the quadrocopter may become hot.
- Keep the quadrocopter and accessories away from open fire and hot surfaces.
- Do not place open fire sources, such as lit candles, on or near the quadrocopter or the remote control.
- Do not bring the USB charging cable into contact with hot parts.
- Never immerse the quadrocopter in water or use a steam cleaner to clean it. Otherwise the quadrocopter may be damaged.
- Do not use the quadrocopter if the plastic or metal parts of the unit have splits or cracks or are misshapen. Replace damaged parts only with fitting original spare parts.
- Damage to the quadrocopter, the camera, the remote control or the accessories caused by external influences such as impacts, falls or anything else is not covered by the warranty and are chargeable.
- Please inform yourself about the current legal situation in your country regarding the use of the quadrocopter you have purchased.
On some countries it is mandatory to take out a special model owner liability insurance for the operation of a quadrocopter. Information on this can be obtained from the model sports associations or from an insurance company.
A mains adapter is not included.
17
Start
Keep plastic film and bags away from infants and young children.
If the packaging is opened carelessly with a sharp knife or other pointed objects, the product can be damaged.
- Please open the packaging carefully
1. Check whether the delivery is complete
(see Fig. A on page 3).
2. Remove the quadrocopter j from its packaging and check whether the unit or parts are damaged. If this is the case, do not use the quadrocopteM . Contact the service address of the manufacturer listed on the warranty card.
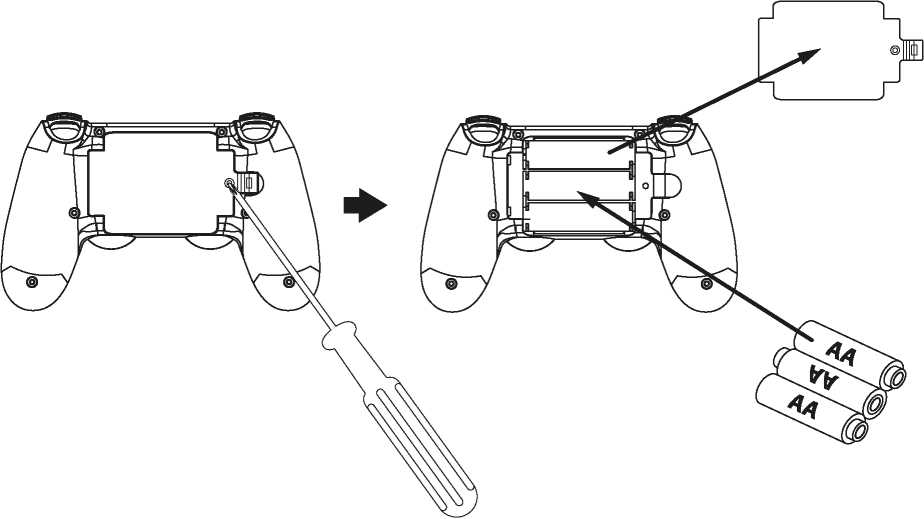
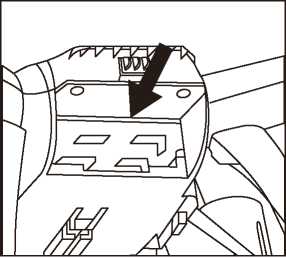
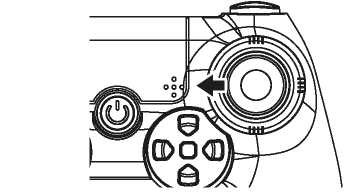
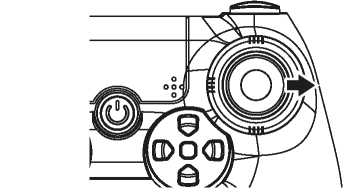
To insert batteries
into the remote control
, first open
the remote control
,2
. The battery compartment is located
on the back of the remote control
252
. Now open the battery
compartment cover by first unscrewing the screw with the
screwdriver
, then pulling the clamp on the top slightly
inwards and then lifting off the cover.
First remove any existing batteries from the battery
compartment. Insert 3 fully charged batteries
3J
. When
inserting batteries
make sure they have the correct
polarity, which is marked for each battery in the battery compartment
L25H
Close battery compartment
again with protective cover.
19

- You can also use rechargeable batteries of the same specification at 2000 mAh or higher instead of LR6 (AA) batteries. We recommend NiMh batteries with low self-discharge (not supplied).
- Check your batteries regularly. old or empty batteries must be replaced.
- If you do not intend to use the remote control for an extended period of time, remove the batteries to prevent them from leaking.
Check that the quadrocopter is assembled as instructed. The installation must always be carried out under the supervision of an adult .
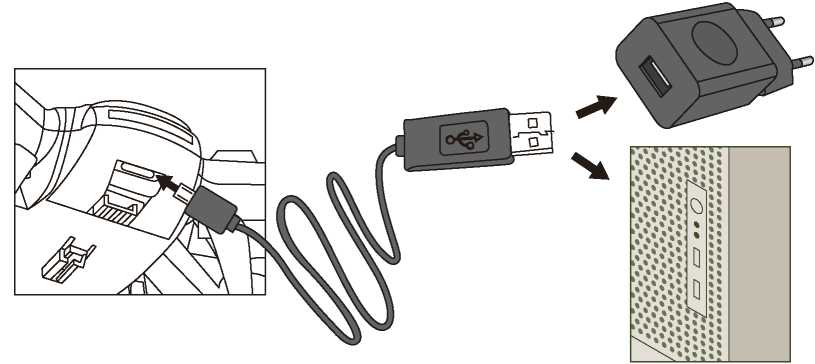
Before using the quadrocopter j , the lithium polymer
battery
must be charged. The battery
should also be
charged as soon as the flight performance decreases. You
have 2 methods to charge the battery:
1. Connect the Micro USB
port
31.
to the USB charging cable
. You can connect the USB charging cable
to a USB
port on your computer, a power bank, or a standard USB
power plug to charge the battery.
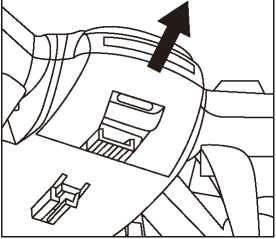
2. Remove the battery compartment
30 b_____________
with the battery on
the bottom of the quadrocopter by sliding it towards the
rear LED light
in the direction of the arrow.
32J
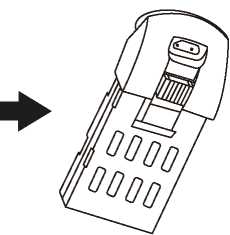
21
3. Now connect the Micro USB port
31
of the battery
compartment
.30.
to the USB charging cable
.You can
connect the USB charging cable
to a USB port on your
computer, a power bank, or a standard USB power plug
to charge the battery
8J
. When the battery
is fully
charged, the red LED on the
battery compartment
goes out.
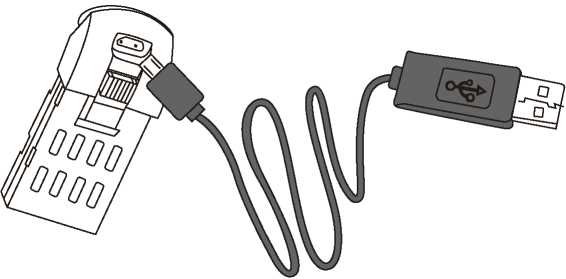

30]
from the USB
4. Disconnect the battery compartment
charging cable
and slide the battery compartment
back into the quadrocopter.
Charging takes about 60 minutes when the battery is completely empty. The flight time with fully charged battery is approx. 7 minutes.
slide it onto the rail on the
To mount the supplied camera
bottom of the quadrocopter i until the camera locks into place. Connect the camera by plugging the camera connector
into the camera connector
.34,
of the quadrocopter j .
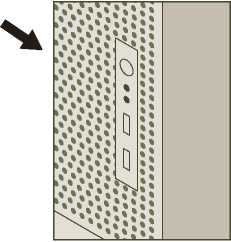
A memory card must have been inserted in order to save photos and videos. Before turning on the quadrocopter J insert a micro SD / SDHC memory card into the camera's
memory card slot
- Insert the memory card as shown in the figure below. Press the memory card into the memory card compartment until it clicks into place.
- To remove memory card push card in again until it is partly ejected.
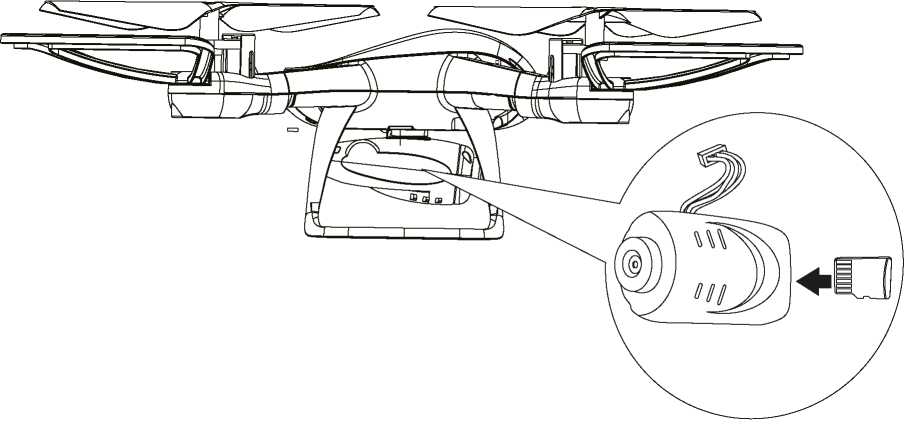
23

- To avoid damaging a memory card, turn off the quadrocopter before inserting or removing the memory card.
- MicroSD/SDHC memory cards up to a capacity of 32 GB are supported.
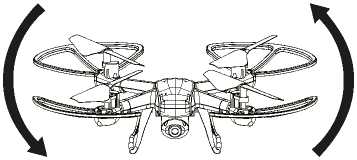
Before you fly with the quadrocopter, first read this manual to learn about its control functions and then perform some exercises.
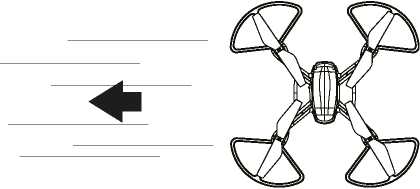
Place the quadrocopter on a flat surface. The back of the
quadrocopter (red position LEDs
) must be facing you. First
practice controlling the hovering flight with the left control
stick
24
. Then try to change the position of the quadrocopter
with the direction control stick
16
(forward, back, sideways)
and catch it if necessary.
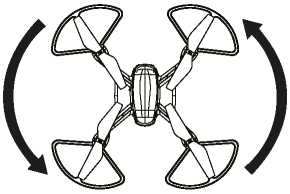
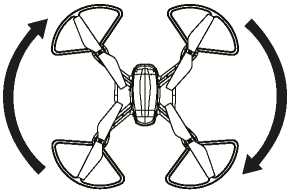
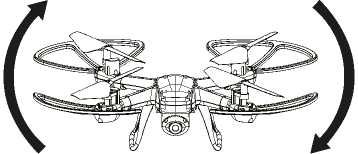
Finally, you should practice turning the quadrocopter around
its own axis with the left control stick mastered the basic functions of the quadrocopter, you can perform your first controlled flight.
. Once you have
on the side of the
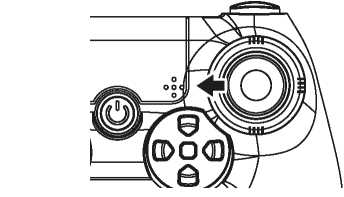
To switch on, use the On/Off switch quadrocopter J . All LEDs on the quadrocopter will start blinking. When the remote control is switched on, the LEDs blink slower.
Place the quadrocopter on a level surface with the tail facing you to ensure that the gyroscope is centered. Now turn on the
remote control
by pressing the On/Off switch
20
on the
remote control
. The power LED of the remote control
blinks constantly red as soon as it is switched on. An audible signal will also sound. The connection to the quadrocopter
has been established. Press the left control stick
24,
(pitch/
yaw) to the highest position and then back to the lowest position. An audible signal will sound in each case. Coupling the remote control to the quadrocopter is complete as soon as all LEDs on the quadrocopter light up. Do not move the
quadrocopter j while it connects to the remote control
with the On/Off
After flying, turn off the remote control
switch
and the power LED goes out. Then press the On/
Off switch
L33J
on the side of the quadrocopter i to turn it off,
the LED lights go out.

If you do not intend to use the remote control for an extended period of time after switching it off, remove the batteries to prevent them from leaking.
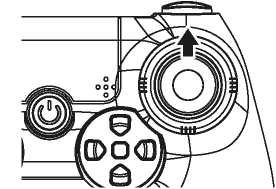
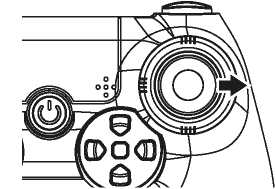
Press the Start/Landing button
to start the quadrocopter
rotors. Press the left control stick
'24'
upwards to bring
the quadrocopter to a certain height. This height is then maintained.
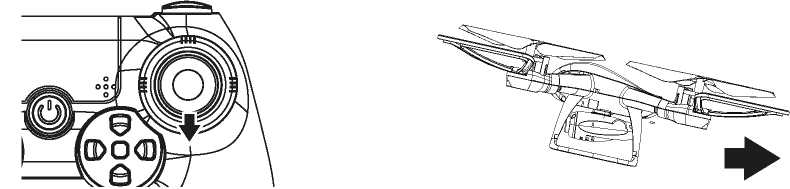
Press the Start/Landing button the quadrocopter. While you are landing, you can use the
again to gently land
direction control sticks
to determine the direction so that
you land in the right place. The rotors switch off automatically after ground contact.
25
Below you will find a description of how to control the quadrocopter.
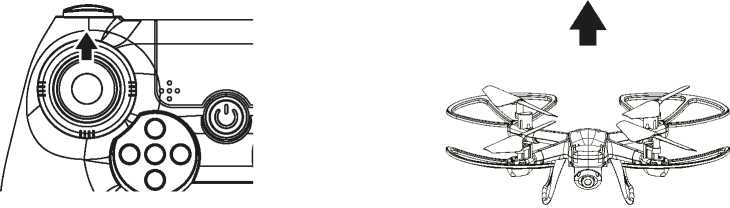
- Ascend: Press the left control stick
24
upwards. The rotors
turn faster and the quadrocopter rises.
24
Descend: Press the left control stick
downwards. The
rotors turn slower and the quadrocopter falls.
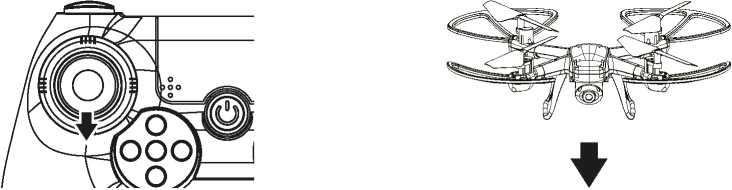
24?
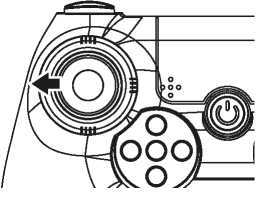
Turn to the left: Press the left control stick
to the left.
The quadrocopter rotates on its own axis to the left.
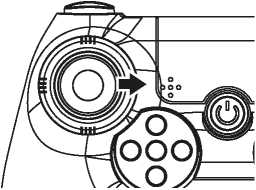
Turn to the right: Press the left control stick
24.
to the
right. The quadrocopter rotates on its own axis to the right.
16 '
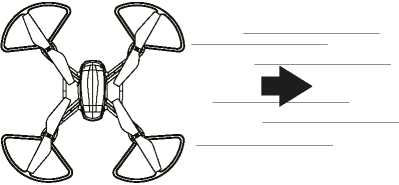
Fly forward: Press the direction control stick
upwards.
The front of the quadrocopter tilts down and it flies forward.
16
Fly
backward: Press the direction control stick
downwards. The tail of the quadrocopter tilts down and it flies forward.
27
Fly to the left: Press the direction control stick
16
to the
left. The quadrocopter tilts slightly to the left and flies to the left.
16
to the
- Fly to the right: Press the direction control stick
right. The quadrocopter tilts slightly to the right and flies to the right.
You can set three speed modes: Beginner mode, Normal mode and Advanced mode.
- Beginner: Press the speed
controller
10
. The remote control emits an acoustic signal.
The beginner mode is activated.
Normal: Press the speed controller
,10 j
. The remote control
emits two acoustic signals. The normal mode is activated.
- Advanced: Press the speed controller
10
. The remote
control emits three acoustic signals. The advanced mode is activated.
To perform in-flight rolls and flips with the quadrocopter, press the
Flip button.
L15J
. An audible signal
will sound for 4 seconds. The
quadrocopter is now in aerobatic mode.
While the aerobatic mode is activated you can perform the following flight maneuvers.
- Rolle left: Press the direction control stick
16
to the left.
The quadrocopter rolls to the left.
16J
Rolle right: Press the direction control stick
to the right.
The quadrocopter rolls to the right.
29
- Frontflip: Press the direction control stick
upwards. The
16
quadrocopter makes a somersault forwards (frontflip).
Backflip: Press the direction control stick
16:
downwards.
The quadrocopter makes a somersault backwards (backflip).
If you perform a maneuver in aerobatic mode, the quadrocopter should have an altitude of at least 2 meters.
Please note that the range of the remote control signal is approx. 40 meters. You have to stay in this range with the quadrocopter. If the quadrocopter leaves the radius of the remote control, you can no longer control it!
21
For example, if your quadrocopter i encounters an obstacle, press the Emergency Stop button emergency stop. The quadrocopter H stops the flight by switching off the rotors and then crashing to the ground.
to initiate an
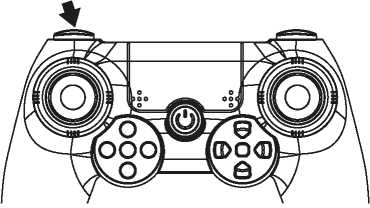
Depending on the battery condition you have to trim the quadrocopter j regularly to maintain a stable flight position.
Let the quadrocopter j float calmly at one point and observe the changes when activating the trim controls.
Three buttons are available for trimming the flight attitude:
- Nick trimming
14
and
: For trimming the nick position
(back and forth).
Roll trimming
13
and
17
: For trimming the roll position
(left and right).
to return the
You can use the One Key Return button
quadrocopter to the remote control location. Since the quadrocopter does not have a GPS sensor, however, the prerequisite for this is that the quadrocopter is in a straight flight path in front of the remote control and the blue position LED points away from the remote control. Activate
the One Key Return with the One Key Return key
L231
. The
quadrocopter flies back towards the remote control. When the desired position is reached, press the One Key Return
button
23J
again, or press the right control stick forward to
cancel the One Key Return.
31
The headless mode is a so-called relative control mode. The quadrocopter always flies in the direction in which the right control stick is controlled, regardless of its orientation. No matter whether the front of the quadrocopter is in front, behind, left or right.
Beginners can quickly complete some flight exercises in headless mode. To control a quadrocopter correctly, however, the normal mode should be preferred. To activate the
Headless mode, press the Headless mode button
12
. Three
fast audible signals and the blinks of the quadrocopter LEDs indicate the activated mode. To deactivate, press the button again.
If you have mounted and connected the supplied camera to the quadrocopter j , you have the possibility to take pictures and videos during your flights.
Taking photos: Press the Capture button
L22J
to take a
picture. The LEDs on the quadrocopter and the camera briefly blink once.
- Recording videos: Press the Video Record button
L18J
to
make a video recording. During recording, the LEDs on the quadrocopter and camera blink continuously. Press the Video Record button again to stop recording.
• To make a video recording with sound, briefly press the
Video Record button once
18
• To make a video recording without sound, press and hold
the Video Record button for more than 2 seconds
Li8j
The level of the battery charge of the quadrocopter is indicated by the LED lights of the quadrocopter.
Battery full: The LEDs of the quadrocopter light up constantly
Batterie empty: The LEDs of the quadrocopter blink in a fast rhythm and the quadrocopter lands automatically.
Please land the quadrocopter when the LEDs start blinking due to a low battery. Weather conditions and strong winds can strongly influence automatic landing when the battery is low, especially outdoors.
Please remove the battery from the quadrocopter before replacing a defective rotor blade for safety reasons. Then loosen the screw in the middle of the defective rotor blade from above. Remove the defective rotor blade and insert the new one. Reattach the new rotor blade with the screw. Tighten the screw well, but be careful not to overtighten.
33
|
Model: |
QC-50S |
|
Camera sensor: |
2.0 Megapixels |
|
Photo resolution: |
1920 x 1080p (interpolated) |
|
Video resolutions: |
1.280 x 720p @ 30fps |
|
Recording medium: |
Supports SD/SDHC memory cards up to 32 GB (optional) |
|
Speeds: |
beginner, normal, advanced |
|
Remote control range: |
approx. 40 meters |
|
Frequency range: |
2400 - 2483,5 MHz |
|
Maximum radio frequency: |
20 dBm |
|
Power supply: |
Input: USB 3.7 V — 6 A |
|
Battery: |
3.7 V —; 600 mAh lithium-polymer battery |
|
Flight time: |
approx. 7 min |
|
Charging time: |
approx. 60 min |
|
Operating Temperature: |
-10 °C -+45 °C |
|
Dimensions: |
26.5 cm x 26.5 cm x 7.5 cm |
|
Weight: |
88 g with camera, 80 g without camera |
Design and Technical specification are subject to change.
This device complies with Part 15 of the FCC Rules. Operation is subject to the following two conditions: (1)This device may not cause harmful interference, and (2)This device must accept any interference received,including interference that may cause undesired operation.
Warning: Changes or modifications to this unit not expressly approved by the party responsible for compliance could void the user’s authority to operate the equipment.
NOTE: This equipment has been tested and found to comply with the limits for a Class B digital device, pursuant to Part 15 of the FCC Rules. These limits are designed to provide reasonable protection against harmful interference in a residential installation. This equipment generates, uses and can radiate radio frequency energy and, if not installed and used in accordance with the instructions, may cause harmful interference to radio communications.
However, there is no guarantee that interference will not occur in a particular installation. If this equipment does cause harmful interference to radio or television reception, which can be determined by turning the equipment off and on, the user is encouraged to try to correct the interference by one or more of the following measures:
- Reorient or relocate the receiving antenna.
- Increase the separation between the equipment and receiver.
- Connect the equipment into an outlet on a circuit different from that to which the receiver is connected.
- Consult the dealer or an experienced radio/TV technician for help.
35
When not in use please disconnect the quadrocopter from the power supply and store it in a clean and dry place outside of the reach of children.
The quadrocopter gets hot during use!
- Let the quadrocopter cool down completely prior to any cleaning!
Any water that has entered the housing can cause a short circuit.
- Never immerse the quadrocopter in water.
- Ensure that no water enters the housing.
Improper handling of the quadrocopter can cause the quadrocopter to be damaged.
- Do not use any aggressive cleaners, brushes with metal or nylon bristles or sharp or metallic cleaning objects, such as knives, hard scrapers and similar. These can damage the surface.
- Never place the quadrocopter in the dishwasher. This will destroy the device.
1. Allow the quadrocopter to cool down completely.
2. Wipe the quadrocopter with a slightly damp cloth. Allow the quadrocopter to dry completely.
37
Disposal
For disposal, separate packaging into different A types. Cardboard and board must be disposed of as paper and foil must be recycled.
(Applicable in European Union and other European countries using systems for separate collection of recyclables)
\ Old devices must not be disposed of in Household waste!
If the quadrocopter can no longer be used, every ' L > consumer is legally obliged to dispose of old appliances separately from Household waste, e.g. at a collection point in his municipality or district. This ensures that used equipment is recycled correctly and that negative effects on the environment are avoided. Electrical equipment is consequently marked with the adjacent symbol.
\ Batteries and integrated batteries may not be disposed of in domestic waste! As a consumer, you are legally obliged to dispose of all batteries ' and rechargeable batteries, whether or not they contain harmful substances*, at a collection point in your municipality/ district or at a retail outlet so that they can be disposed of in an environmentally friendly manner.
* marked with: Cd = cadmium, Hg = mercury, Pb = lead
Quality products for Life.
VISIT US AT:
Distributed by: supra Foto-Elektronik-Vertriebs-GmbH, Denisstr. 28A 67663 Kaiserslautern, Germany Made in China
lyT WWW.MAGINON.US
Down!
oaded from
manuals search engine
These buttons only work on quadrocopter models that have a camera.